One of the great things about Xero is that they are always improving the programme. Recently, they have made changes to the Account Transactions report, a report that we use all the time in schools. I’ve detailed the changes below, and included some recommendations.
Accounts
You can now choose which accounts to include. Previously, any ledger without current year transactions would not show in this report, for example, MOE project ledgers that spanned more than one year. Now you have three options to choose from.
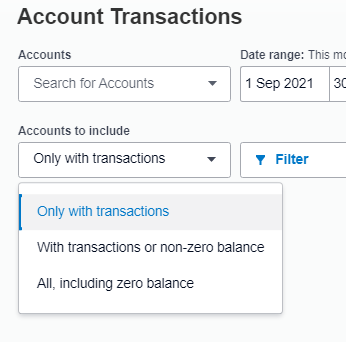
- For reports that have opening balances that you still need to see, such as in an MOE projects reports, choose “With transactions or non-zero balance”. This will show ledgers both with opening balances and no current transactions, and any projects that have been completed within a calendar year and now have a nil balance.
- If you want to see every ledger, regardless of balance, select “All, including zero balance”.
- “Only with transactions” will include only selected accounts that have had transactions in the selected period.
Columns
This has not changed much from previous versions. We recommend you select Account Code as one of the columns.
Grouping/Summarising
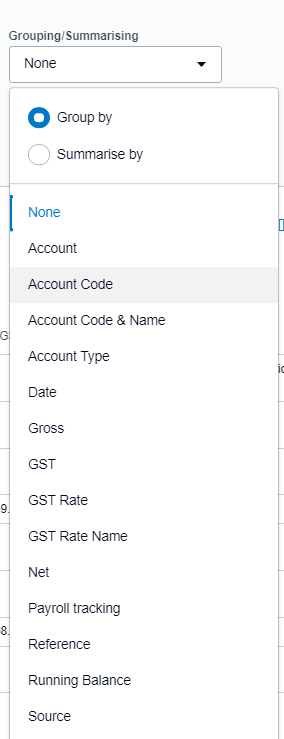
Some good changes here.
Grouping basically refers to how the accounts are sorted.
Xero have added Account Code & Name, which we recommend you use as the default. It gives both the ledger number and title in the account headings, so that the accounts are sorted in numerical order and you are able to see the ledger number.
You can group ledgers by any of the options pictured – some more useful than others! Or select None to remove all grouping for a report with all transactions sorted by date.
Summarise by shows a report with only the closing balances at the end of the selected period.
Filter
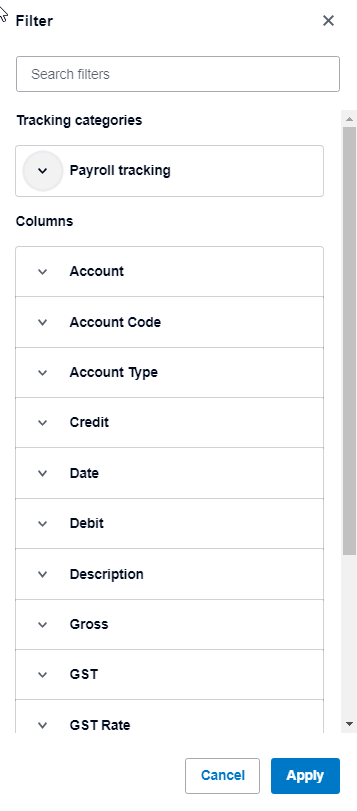
a) Search filters – you can enter an account title, code or type in this field to quickly limit the search parameters.
b) Other options are fairly self-explanatory. Gross/GST/Net filters can be used to show results within a range of figures e.g. > $10,000.
c) Description can almost be used as a wild-card search if you are mindful of what you are entering in the description field at data entry. Select all accounts and enter the term you are looking for.
d) Combine filters to make your reports quite specific.
e) Click apply when you have finished.
More
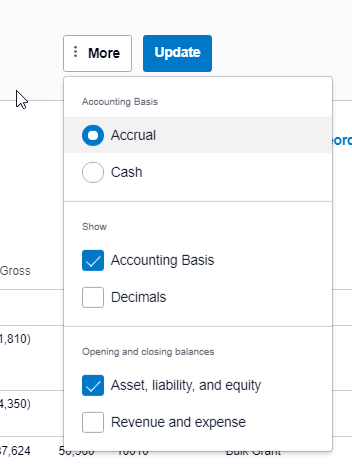
a) In most cases, select Accrual basis.
b) Accounting Basis – rounds the figures in the report
c) Opening and closing balances – select to hide or show the opening balances for the two categories of accounts
Reorder columns
A welcome return to this report. Drag and drop the columns into your preferred arrangement.
Notes:
- You still have the ability to add a footnote or text block.
- Number of transactions per report now defaults to 1000 items per page.
Custom Reports
Don’t forget that you can save your formatted report as a custom report.
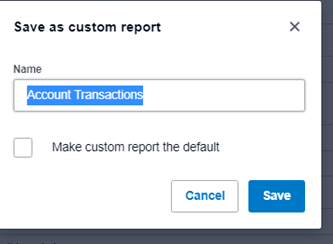
Click Save As, Custom.
If you are saving the report for its format, not the selected ledgers, rename the report to Account Transactions New or something similar.
Tick Make custom report the default. Any account transactions reports you run in future will automatically have the saved format.
Save.
Click into the Custom tab and star the saved report. This will mark the report as a favourite in the drop down menu.
If you are saving the report for its specific ledgers, rename the report before saving as a custom report. This report can also be starred and will appear in the Accounting drop down menu. All default and custom reports can now be starred.
I usually save reports as a custom report for formatting purposes and have a formatted custom report for accounts transactions, fixed assets, depreciation schedules etc.
Once I have saved the formatted report, I then run the report with specific selected accounts, rename and save it as a draft report. I use these draft reports for my day-to-day work.